Any website hosted through Hawk Host which is using Hawk Host's nameservers (nsX.hawkhost.com) will have full control over their DNS zone using the Zone Editor interface found in cPanel. You can use this interface to add or edit your domains A, AAAA, CAA, CNAME, DMARC, MX, SRV, and TXT records.
Editing existing DNS Records for your domain
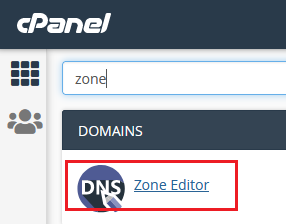
- Login to your hosting accounts cPanel and use the search to access the "Zone Editor" interface:

- You will be redirected to the Zone Editor and a list of all domains hosted from your account will be shown.
- Locate the domain you're looking to modify and to the right of the domain click the "Manage" button:

- After clicking Manage you will be redirected to your domain DNS zone. All your existing DNS records will be listed with an "Edit" button listed to the right of each record. Use this button to edit any of the provided values for your existing DNS records.
Adding an A Record to your domain
- Login to your hosting accounts cPanel and use the search to access the "Zone Editor" interface:

- You will be redirected to the Zone Editor and a list of all domains hosted from your account will be shown.
- Locate the domain you're adding an A record to and to the right of the domain click the "+A Record" button:

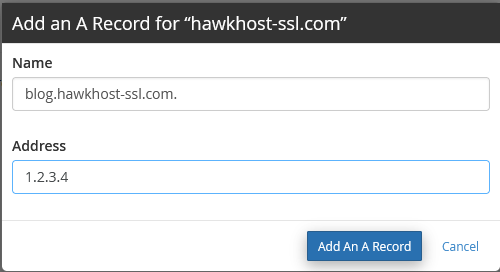
- A popup window will appear asking for your domain for the new record along with the IP address where the record should be pointed. For example if we wanted to add an A record for blog.yourdomain.com pointed to the IP address 1.2.3.4 we would enter those details as follows:

- Click "Add An A Record" to save your changes and add the record to your DNS zone for your domain.
Adding a CNAME Record to your domain
- Login to your hosting accounts cPanel and use the search to access the "Zone Editor" interface:

- You will be redirected to the Zone Editor and a list of all domains hosted from your account will be shown.
- Locate the domain you're adding an A record to and to the right of the domain click the "+CNAME Record" button:

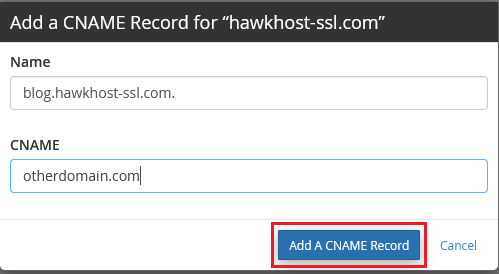
- A popup window will appear asking for your domain for the new record along with the CNAME (destination) where the record should be pointed. For example if we wanted to a CNAME record for blog.yourdomain.com and redirect those requests to yourotherdomain.com we would enter those details as follows:

- Click "Add A CNAME Record" to save your changes and add the record to your DNS zone for your domain.
Adding an MX Record to your domain
- Login to your hosting accounts cPanel and use the search to access the "Zone Editor" interface:

- You will be redirected to the Zone Editor and a list of all domains hosted from your account will be shown.
- Locate the domain you're adding an MX record to and to the right of the domain click the "+MX Record" button:

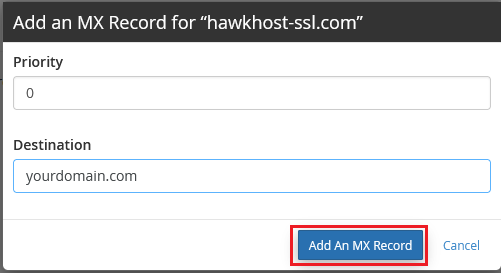
- A popup window will appear asking for MX Priority (0 is the lowest possible) along with the Destination (your email server) where the record should be pointed. For example if we wanted to an MX record for with a priority 0 and route mail through yourdomain.com we would enter that information as follows:

- Click "Add An MX Record" to save your changes and add the record to your DNS zone for your domain.
Adding a DMARC Record to your domain
Please refer to our KB article How do I create DMARC entries for my domain names? for a guide on creating DMARC records for your domain.
Adding other (AAAA, CAA, SRV, TXT) DNS Records to your domain
- Login to your hosting accounts cPanel and use the search to access the "Zone Editor" interface:

- You will be redirected to the Zone Editor and a list of all domains hosted from your account will be shown.
- Locate the domain you're looking to modify and to the right of the domain click the "Manage" button:

- From the middle-right of the Zone Records page click the arrow dropdown next to "+ Add Record" to add your new record. Select your record type from the provided dropdown:

- Follow the provided prompts to complete the process of adding your new record to this domains zone file.


